FoCal Setup Checklist
We have created a checklist so you can tick off the major things to get ready before testing.
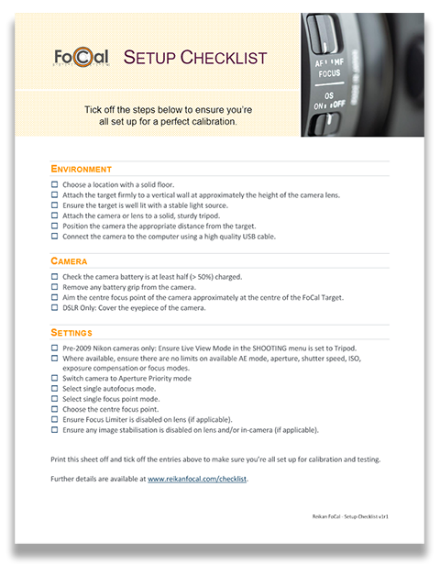
Click to download the FoCal Setup Checklist
Details
The following section details the reasoning behind each checklist entry:
Environment
Choose a location with a solid floor
Ground floor locations are less likely to vibrate when people move, trucks drive past outside the building etc. The quality of your test results will be affected if there is vibration to the camera/lens during the test.
Attach the target firmly to a vertical wall at approximately the height of the camera lens
If you print the target yourself, make sure it is flat and cannot blow around during testing. We recommend using a FoCal Hard Target (available from the Reikan FoCal Store at store.fo-cal.co.uk) as these are the targets we use for all our development and testing.
Ensure the target is well lit with a stable light source
We don’t recommend the use of fluorescent or LED lighting as they can flicker – you won’t be able to see this with your eye, but the camera can be affected and the results may not be as accurate as possible. Also avoid changeable outdoor lighting - e.g. clouds moving across the sky. FoCal can compensate for small light level changes, but large changes can cause problems during testing.
Attach the camera or lens to a solid, sturdy tripod
If the option is available for your tripod, you can hang something heavy from the hook at the base of the centre column to further stabilise the camera lens during testing.
For large lenses, use the supplied tripod collar and attach the lens to the tripod (not the camera) – this will not only reduce strain on the camera mount, but also make the whole camera/lens system more stable.
Position the camera the appropriate distance from the target
The Target Distance Tool in FoCal will guide you. You can use this either with or without the camera connected to FoCal. More information is available at help.reikanfocal.com/targetdistance.
Connect the camera to the computer
Use the USB cable supplied with your camera or a high-quality alternative, and avoid extension cables. Low quality USB cables can cause considerable unreliability during testing and it’s usually the first thing we suggest changing if you get unreliable operation of FoCal!
Camera
Check the camera battery is at least half (> 50%) charged
Low batteries can cause the tests to run incorrectly or to fail. FoCal can catch and properly identify most issues, but if a battery is low or exhausted the camera may behave unexpectedly and you may see strange behavior.
Remove any battery grip from the camera
Battery grips can cause considerable extra vibration when mounted on a tripod – remove them before you calibrate.
Aim the centre focus point of the camera approximately at the centre of the FoCal Target
You don’t have to be too precise - positioning will be confirmed during Target Setup.
DSLR Only: Cover the eyepiece of the camera
This stops stray light entering the back of the camera and affecting exposure during tests.
Settings
Ensure the camera is in Photo mode (not Video mode)
If there is a mode selector for photo/video mode, ensure the camera is set to photo otherwise FoCal may not operate correctly.
Ensure WiFi is disabled
On some cameras, enabling WiFi will stop the ability of the camera to connect to a computer via a cable, so ensure WiFi is disabled.
Shoot Without Card option
If the
- Canon: “Shoot w/o card” is disabled, or
- Nikon: “No shutter release without card” is enabled
Then you will need to ensure there is a memory card in the camera and it is formatted and has available space.
Pre-2009 Nikon cameras only: Ensure Live View Mode in the SHOOTING menu is set to Tripod
This is required to allow the correct control of the camera during testing. If you do not set this, FoCal will not be able to control various aspects of the camera and the results will be incorrect.
Where available, ensure there are no limits on available AE mode, aperture, shutter speed, ISO, exposure compensation or focus modes
High end cameras usually allowing disabling of unused modes in the custom settings. You may encounter problems if modes are disabled.
Switch camera to Aperture Priority mode
This is usually marked as A or Av on the camera mode dial or top screen.
Select single autofocus mode
For Canon this is “ONE SHOT” mode, for Nikon it is “AF-S”.
Select single focus point mode
You should not use any auto focus point modes. When you look through the viewfinder and activate autofocus (half-press the shutter button or use the AF-ON button), you should see only a single, non-moving AF point selected.
Choose the centre focus point
Most FoCal tests require use of just the centre focus point, so set that single point (from the step above) to the centre.
Ensure Focus Limiter is disabled on lens (if applicable)
FoCal may use the whole of the lens focus range during testing. You may encounter errors if the range of focus is limited on the lens, so make sure the limiter is set to OFF or the minimum-to-maximum range (note this option is not present on all lenses – it’s usually available on longer telephoto lenses or macro lenses).
Ensure any image stabilisation is disabled on lens and/or in-camera (if applicable)
Some cameras (e.g. Nikon Z6/Z7 mirrorless cameras) have in-body image stabilisation which should be disabled as well as any lens stabilisation.